Pet Grooming
How To Bathe A Dog Properly Step By Step Guide
Clean Coats, Happy Hearts: The Ultimate Dog Bathing Guide
# How To Bathe A Dog Properly Step By Step Guide
Giving your dog a bath is more than just a chore; it is a vital part of maintaining their overall health, comfort, and hygiene. Regular bathing helps remove dirt, debris, parasites, and odors that can accumulate on their fur and skin. However, improper bathing techniques can lead to dry skin, irritation, or extreme anxiety for both the owner and the pet. Many pet owners find that their dogs fear baths due to past negative experiences or lack of preparation.
This comprehensive guide provides a detailed, step-by-step approach to bathing your dog correctly. Whether you have a small terrier or a large Great Dane, following these structured steps will transform bath time from a chaotic struggle into a soothing, positive routine. By understanding canine skin physiology and preparing adequately, you ensure your furry friend remains clean, comfortable, and happy.
## 1. Gather Necessary Supplies and Prepare the Environment
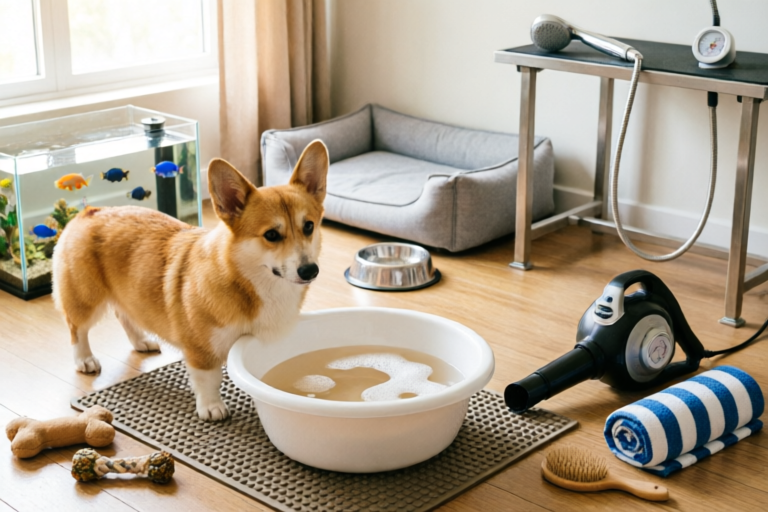
The success of a dog bath often depends entirely on what happens before you turn on the water. Preparation eliminates panic and ensures efficiency. Rushing to grab a bottle of shampoo once the dog is already in the tub creates chaos. Instead, dedicate time to assembling your toolkit and setting up the space.
### Identify Essential Tools
Before starting, gather all necessary items and place them within arm’s reach of the bathing area. You do not want to leave the wet dog unattended even for a second to go fetch something.
* **Dog-Safe Shampoo:** Human shampoo has a different pH balance than canine skin and can cause severe irritation. Always select a shampoo formulated specifically for dogs. Consider your dog’s specific needs: hypoallergenic formulas for sensitive skin, medicated shampoos for fungal infections, or de-shedding solutions for heavy shedders. If you have an older dog or a puppy, choose a tear-free and gentle formula.
* **Absorbent Towels:** Having multiple large, absorbent towels ready is crucial. Microfiber towels are highly recommended because they absorb water much faster than standard terrycloth cotton, significantly reducing drying time and energy expenditure for your dog.
* **Grooming Brushes:** Different coat types require different tools. A slicker brush works well for medium-length fur, while a pin brush is better for silky coats. For double-coated breeds like Huskies, an undercoat rake is essential before the bath begins.
* **Non-Slip Mat:** Dogs slip easily on smooth ceramic or tile surfaces, which causes fear and anxiety. Placing a rubber mat or an old yoga mat inside the bathtub or basin provides traction and security, allowing the dog to stand firmly.
* **Cup or Sprayer:** You may need a dedicated cup for pouring water gently or an adjustable handheld showerhead with a “stop” function to control water flow.
* **Treats:** High-value rewards such as chicken jerky, freeze-dried liver, or soft chews are powerful incentives to keep your dog calm and cooperative.
### Ensuring a Secure and Temperature-Controlled Area
The physical environment plays a massive role in your dog’s comfort level.
* **Temperature Control:** Ensure the room where the bath takes place is warm enough. Cold drafts can chill a wet dog immediately. Close windows and doors, and consider turning on a heater if it is winter. The water temperature is equally critical; lukewarm water is ideal. Test it on your inner wrist before applying it to the dog. It should feel neutral, neither hot nor cold. Hot water burns, and cold water shocks.
* **Space Configuration:** If using a bathtub, lower the dog in gently. For large dogs that cannot easily enter a tub, consider bathing them in a sink or outdoors on grass if the weather permits. Ensure the exit path is clear. Place a bucket nearby for rinsing if needed.
* **Minimizing Noise:** Some dogs are startled by loud running water or the gurgling sounds of a vacuum hose if used for suction later. Turn off the dishwasher or washing machine beforehand. Speak in a soft, reassuring voice throughout the entire process to maintain a low-stress atmosphere.
By investing time in the preparation phase, you set the stage for a successful bathing session. This proactive approach reduces the likelihood of accidents, injuries, or behavioral issues during the wash.
## 2. Brush the Coat and Protect Sensitive Areas
One of the most common mistakes owners make is wetting a tangled coat immediately. Wetting matted fur causes the tangles to tighten significantly, making them painful to comb out later. This is why brushing comes before water.
### Detangle Matted Fur Before Applying Water
Thoroughly brushing your dog removes loose hair, dirt, burrs, and pre-existing tangles. When the coat is dry, the hair strands lie naturally and move apart, making it easy to spot knots.
* **Step-by-Step Brushing Technique:** Start near the head and work towards the tail. Be gentle around sensitive areas like the armpits, groin, and tail base, which are prone to matting.
* **Tools for the Job:** Use a pin brush for general grooming and a metal comb to check for remaining tangles at the roots. If you encounter a tight mat, try to tease it apart gently with your fingers first. Do not force a brush through a knot; pull it slowly with the grain of the hair.
* **Removing Debris:** In addition to loose hair, brushing helps remove dead skin cells and surface dirt. This makes the subsequent shampooing process more effective because the shampoo can actually reach the skin rather than getting stuck on the surface debris.
* **Double-Coated Breeds:** For breeds with double coats, pay extra attention to lifting the top coat to expose the dense undercoat. Using an undercoat rake gently here ensures you aren’t removing the protective guard hairs while clearing the undercoat mud.
### Protect Sensitive Areas from Irritation and Water Damage
Once brushing is complete, protect the parts of your dog that are especially vulnerable to infection or damage during the bath.
* **Cotton Balls for Ears:** The ear canal is sensitive, and moisture trapped inside can lead to otitis externa (ear infection). Gently place cotton balls loosely in the outer opening of each ear. These should act as a shield to prevent water from entering the canal. Avoid pushing them deep; they simply need to plug the entrance lightly. Remove them immediately after drying is complete.
* **Eye Protection:** While dog-safe shampoo usually minimizes stinging, it is best to avoid getting soap near the eyes. If your dog tolerates it, apply a small drop of vet-approved lubricating ointment to the corners of the eyes to provide a buffer against accidental splashes. Wipe any visible tears gently with a damp cloth.
* **Trimming Nails:** While not always required, trimming nails shortly before or after the bath prevents scratching yourself or the dog during handling. Sharp claws increase the risk of injury when the dog is slippery or agitated.
* **Face Care:** Avoid getting water directly in the face. Most dogs prefer to avoid facial contact with water. If your dog allows you to wipe their face, use a damp washcloth rather than spraying water. Use a separate, mild cleanser for the face if there is food or grime stuck around the muzzle.
Taking these precautions demonstrates that you care about your dog’s long-term health, not just the temporary cleanliness. Proper preparation saves time later and prevents complications like ear infections or painful skin pulling during the brushing post-bath.
## 3. Wet, Lather, and Rinse Thoroughly
Now that the dog is prepped, brushed, and protected, it is time to introduce water. This stage requires patience, gentleness, and attention to detail. The goal is to clean thoroughly without compromising the natural oils of the skin.
### Saturation Techniques
Start by wetting the coat completely, working from the neck down to the paws, and leaving the head for last. A wet coat acts like a sponge; if it isn’t saturated, the shampoo will sit on the outside and fail to cleanse the skin.
* **Water Pressure:** Use a moderate stream of water. Too strong of a jet can be frightening and uncomfortable for dogs. Let the water run over the coat gently until it feels soaked to the touch. Pay attention to thicker fur areas, such as the ruff around the neck or the back of the legs.
* **Direction of Flow:** Direct the water flow downwards, following the growth of the fur. This helps push dirt away rather than rubbing it deeper into the skin. Avoid spraying directly into the ears or nose.
* **Paw Cleaning:** Dogs walk in dirty places constantly. Spend extra time rinsing the paws and between the toe beans. Grime often gets lodged in the spaces between pads. Use your fingers to rub the toes gently while rinsing.
### Apply Shampoo Gently Without Touching the Face
Once the coat is fully saturated, dispense an appropriate amount of shampoo. Overusing shampoo leads to excess residue, while underusing it fails to clean effectively.
* **Dilution is Key:** Unless instructed otherwise, dilute the shampoo with a little water in your hand or a squeeze bottle before application. This creates a richer lather with less product, ensuring easier rinsing.
* **Massage the Skin:** Work the shampoo into the coat using circular motions. Don’t just scrub the fur; massage the skin underneath. This stimulates blood circulation and loosens embedded dirt. Focus on the body, back, chest, and tail. Avoid the head initially.
* **Safe Handling of the Head:** Most dogs dislike having liquid poured over their head. To clean the face, dip a washcloth in soapy water (rinse thoroughly afterward) and gently wipe the muzzle, eyebrows, and cheeks. Never pour shampoo directly onto the face.
* **Special Attention Zones:** Check for odor-prone areas like the anal glands (located near the tail base) and the belly. If the dog rolls in garbage or mud, give these spots a second pass with a bit of extra shampoo concentration.
* **Duration of Contact:** Allow the shampoo to sit on the skin for 3 to 5 minutes as directed by the bottle instructions. This gives the active ingredients time to work, particularly if dealing with fleas, dandruff, or yeast. If your dog becomes impatient, offer frequent treats to keep them still.
### Rinse Until No Soap Residue Remains
Rinsing is arguably the most important step. Leftover soap can cause itching, dermatitis, and attraction to insects because some chemicals smell sweet to animals, causing them to lick themselves raw.
* **Visual Check:** Look for white bubbles or streaks on the dark fur. These indicate soap residue. Keep rinsing until the water runs completely clear.
* **Lift the Fur:** To ensure a deep rinse, use your hands to part the fur in several spots to let water reach the bottom layers near the skin. This is particularly important for thick-coated breeds.
* **Conditioner Usage:** If your dog has dry skin or tangles that were difficult to manage, use a dog-conditioner now. Apply it sparingly, focusing on the ends of the coat, and rinse thoroughly.
* **The Final Rinse:** After conditioning, do a final thorough rinse with cool water. Cool water helps close the hair cuticles, which adds shine and locks in moisture. Finish by giving a quick spray to the paws and wiping the face one last time with a fresh damp cloth.
A perfectly rinsed dog will feel slippery and clean to the touch, not slimy or sticky. If the fur looks dull or feels rough, it likely still has product in it. Patience during this stage ensures skin health down the line.
## 4. Dry the Dog Completely and Clean Up
Wet dogs lose heat rapidly, making immediate drying essential to prevent chills, especially for puppies, seniors, or breeds with thin coats. Proper drying also sets the foundation for post-bath grooming.
### Towel Drying Techniques
Never toss the dog in a blanket and let them air dry indoors unless the weather is perfect and the ventilation is high. Actively assist in the drying process.
* **Pat, Don’t Rub:** Rubbing vigorously can tangle hair and irritate the skin. Instead, press the towel against the fur and lift, squeezing out the moisture. Repeat this process until the towel is soaked.
* **Use Multiple Towels:** Have several dry towels on standby. As the first towel becomes saturated, switch to a fresh one to maximize absorption speed. Change them frequently to maintain warmth.
* **Focus on Critical Areas:** Dry the ears first to prevent trapped moisture, followed by the belly and paws. Wrapping the dog like a burrito can keep them still and calm while you finish towel drying.
* **Microfiber Efficiency:** If using microfiber towels, you will notice significant water removal within seconds. These are superior to cotton for this reason.
### Using Cool Blow Dryers Safely
For many breeds, air drying isn’t fast enough. A blow dryer can drastically reduce drying time and aid in coat management.
* **Cool Air Setting:** Never use the hot setting on a human hair dryer. Dog skin is thinner and more susceptible to burns. Always set the dryer to the lowest heat or "cool only" setting.
* **Keep Distance:** Keep the nozzle at least 6 to 8 inches away from the dog’s coat. Move the dryer constantly rather than holding it in one spot.
* **Desensitization:** If your dog is scared of the noise, desensitize them beforehand. Turn the dryer on in another room while feeding treats. Gradually get them used to the sound and vibration before introducing it during a bath.
* **Professional Dryers:** If possible, invest in a force-pet dryer designed for grooming. These machines are louder but have adjustable airflow speeds that dry the undercoat efficiently without burning the skin. Always cover the dog’s ears to protect them from excessive wind noise.
* **Brushing During Drying:** As you blow dry, gently brush the fur to separate the strands and speed up evaporation. This also helps distribute natural oils evenly.
### Proper Organization of the Bathing Space
After the dog is dry, the focus shifts to tidying up to ensure the next bath is just as organized.
* **Hair Removal:** Collect clumps of loose hair from the floor and drain covers immediately. Wet hair sticks to drains and causes clogs. Use a vacuum or sweep with a dustpan.
* **Disinfection:** Once the dog is removed, wipe down the bathtub or sink with a disinfectant to remove bacteria, hair, and dried soap scum. This keeps the environment hygienic for the next session.
* **Towel Storage:** Hang wet towels immediately to prevent mold and mildew. Wash reusable grooming cloths in hot water.
* **Water Cleanup:** Empty any buckets of water used for rinsing before carrying them out to avoid tripping hazards or spilling.
A clean bathroom reflects a disciplined grooming routine and prevents slips and falls for both humans and pets.
## 5. Conclusion: Creating a Positive Bath Experience
The ultimate goal of this guide is not just cleanliness, but the creation of a lifelong positive association with grooming. A stressed dog is harder to groom next time, potentially leading to avoidance or aggression.
### Rewarding Your Dog
Positive reinforcement is the key to future success. The moment the bath ends and the dog is completely dry, reward them generously.
* **Immediate Treats:** Offer a high-value treat immediately upon completion. This links the end of the unpleasant event with something pleasurable.
* **Play Time:** If your dog enjoys playing, take them to the backyard or a play area after the bath. Running around or fetching toys releases endorphins and signals that the bath was "safe" and over.
* **Praise and Affection:** Use a happy tone of voice. Tell them they are good boys or girls. Physical affection reinforces the bond.
### Training Cues and Reducing Stress
Over time, training cues can condition your dog to accept bath time as a normal, non-threatening part of life.
* **Consistent Commands:** Use a specific phrase like “Bath Time” consistently. Eventually, hearing this cue will become neutral or positive rather than alarming.
* **Short Sessions:** If your dog tolerates baths poorly, shorten the sessions gradually. Celebrate small victories, like standing still for 30 seconds.
* **Routine:** Establish a regular bathing schedule based on the dog’s lifestyle and coat type. Consistency reduces anxiety because the dog knows what to expect.
### Final Advice
Remember that every dog is unique. What works for one may not work for another. Observe your pet’s reactions and adjust your technique accordingly. Whether they shake wildly or stay perfectly still, patience is your greatest tool. By following this step-by-step guide, you ensure that your dog stays clean, healthy, and free from skin infections caused by neglect or poor technique.
Bathing is an opportunity for connection. It allows you to inspect your dog’s skin for lumps, bumps, ticks, or redness. Make the process interactive and caring rather than purely functional. With the right supplies, a prepared environment, and plenty of love, you will master the art of bathing your dog properly.
---
*Disclaimer: Always consult your veterinarian before using medicated shampoos or introducing new products if your dog has existing skin conditions or allergies.*
Comments

SarahB_
This was super helpful! Drying completely is key, learned that the hard way with a sick puppy last time.
👍 7👎 0

DoggoLife
Can you recommend a shampoo for sensitive skin? My pup gets red patches easily.
👍 18👎 0

MudPuppyOwner
Just one warning, make sure towels are absorbent. Mine soaked through immediately so had to grab more.
👍 9👎 0

K9Trainer_Jane
Love the positive reinforcement ending! Treats make a huge difference with anxious dogs.
👍 12👎 0
LunaLover
Step 3 is tricky, I always feel like I leave soap behind. Rinsing took forever today but he looks clean now.
👍 23👎 0

ScruffyDad99
How often should we bathe them? My Golden Retriever smells bad every week even after a bath lol
👍 19👎 0
HappyPupMom
Tried the ear cotton ball tip last night, genius move. Saved me from cleaning wet ear wax later.
👍 6👎 0