Aquatic Pets
How to set up a beginner freshwater aquarium tank easily
Aquatic Serenity, Your Personal Ocean
**✨ Welcome to the World of Freshwater Aquatics**
Starting your journey into freshwater aquarium keeping is one of the most rewarding hobbies you can undertake. Not only does a beautifully planted tank serve as a stunning focal point in your home, providing relaxation and stress relief through its natural movement, but it also offers an educational glimpse into complex underwater ecosystems. However, for many newcomers, the prospect of setting up a tank can feel overwhelming due to the technical jargon and variety of equipment available.
This comprehensive guide, titled “How to set up a beginner freshwater aquarium tank easily,” is designed to demystify the process. Whether you have always dreamed of keeping tropical fish or simply want a low-maintenance centerpiece, following these five core stages will ensure your success. We will walk you through planning, gathering equipment, assembling the tank, cycling the water, and finally stocking and maintaining your new habitat.
By adhering to these guidelines, you minimize common beginner mistakes such as “new tank syndrome” (rapidly changing water parameters) and overcrowding. Let’s dive deep into creating your own slice of aquatic paradise.
## 1. Planning and Preparation
Before purchasing a single item, successful aquarium ownership begins with thorough planning. Rushing into buying a tank without considering your living environment is the most common pitfall for new hobbyists. Proper planning ensures longevity and reduces the risk of structural failure or health issues for future inhabitants.
### Understanding the Benefits of Owning a Freshwater Tank
Freshwater tanks offer unique psychological benefits. Studies suggest that watching fish swim in a calm rhythm can lower blood pressure and reduce anxiety levels. Furthermore, maintaining an ecosystem teaches responsibility and patience, as you learn to balance biological needs with physical upkeep. For families, it serves as an interactive learning tool regarding biology and chemistry.
### Determining the Ideal Tank Size Based on Available Space
Size matters immensely. A general rule of thumb is “bigger is better,” primarily because larger volumes of water are more stable. Fluctuations in pH, temperature, and chemical levels happen much faster in small bowls or tiny tanks than in larger ones.
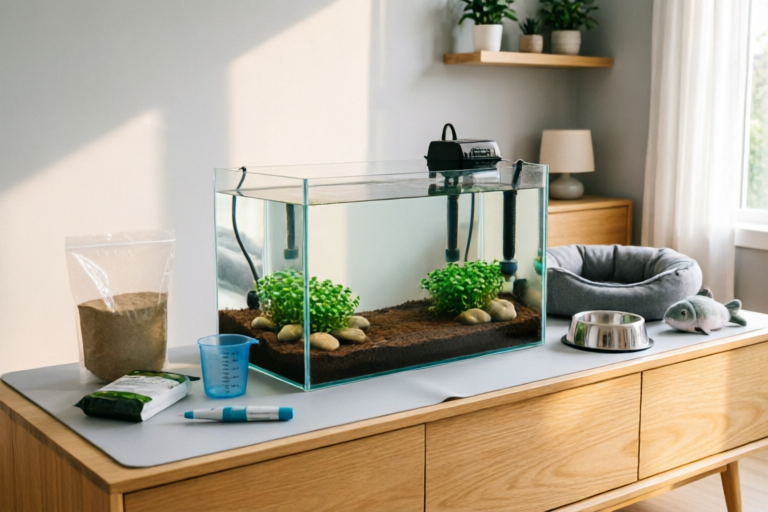
For absolute beginners, we recommend starting with a 20-gallon (approximately 75 liters) long tank. Why? Because it provides enough swimming space for a school of small fish (like tetras) without requiring advanced filtration skills immediately. It also allows for some vertical height for plants. Consider your room dimensions carefully. Remember that water weighs approximately 8 pounds per gallon (1 kg per liter). A 20-gallon tank weighs roughly 170 pounds empty, but fills to nearly 250 pounds including gravel and glass thickness. You must ensure your floor can support this weight comfortably.
### Selecting a Stable Location Away from Direct Sunlight
Where you place the tank is critical for both plant health and safety. Avoid placing the aquarium near windows where direct sunlight hits the glass. Uncontrolled sunlight triggers explosive algal growth (green water or green hair algae), which clouds the tank and competes with plants for nutrients. Additionally, avoid locations where doors bang frequently or heavy footsteps occur nearby; vibrations can stress fish and potentially loosen tank seals over time.
Ensure the location has easy access to a power outlet. You will need outlets for the filter, heater, and lighting, but do not run extension cords across walkways due to the risk of water spills. The stand itself must be perfectly level to distribute the water’s weight evenly, preventing bowing glass and leaks.
## 2. Essential Equipment Checklist
While modern technology has simplified the hobby, certain tools are non-negotiable for a healthy environment. Skimping on quality equipment here often leads to costly repairs later. Here is a detailed breakdown of what you absolutely need to include in your shopping cart.
### Aquarium Stand and Base Support
Never place a fish tank directly on a table or entertainment unit unless it is specifically rated for aquarium weight. Fish stands are engineered to hold the weight of water, glass, and substrate without sagging. For smaller tanks under 20 gallons, sturdy tables work if level. For anything larger, a dedicated steel-framed stand with a solid surface (often laminated wood) is required. This ensures stability and keeps cables hidden and organized underneath.
### Filtration System Options
Filtration is the engine of your tank. It removes debris, processes toxic chemicals, and oxygenates the water. There are three main types:
1. **Hang-On-Back (HOB) Filters:** These are perfect for beginners. They sit on the back rim of the tank, hang down a sponge inside, and pump water out through an overflow tube. They are easy to clean and provide good mechanical and biological filtration for tanks up to 40 gallons.
2. **Internal Power Filters:** Fully submerged units placed inside the tank. Good for betta tanks or breeding setups where flow needs to be adjustable, but they consume valuable interior space.
3. **Canister Filters:** The gold standard for advanced setups. Hidden outside the tank, they provide massive filtration capacity and quiet operation. While excellent, they are more expensive and slightly harder to maintain. For a beginner 20-gallon setup, a medium-sized HOB is often sufficient.
Key features to look for include adjustability of flow rate (some fish hate strong currents) and replaceable foam cartridges plus ceramic rings (for beneficial bacteria).
### Thermostat Heater
Most tropical freshwater fish thrive between 75°F and 80°F (24°C-27°C). Unless you live in a hot climate where room temperature remains constant above this range, you need a reliable heater. Look for an adjustable thermostat submersible heater. Match the wattage to your tank volume (usually 3-5 watts per gallon). For a 20-gallon tank, a 75-watt or 100-watt heater is ideal. Always use a thermometer alongside the heater’s built-in light indicator to verify the temperature accurately.
### Substrate Choices
Substrate isn’t just pretty sand or gravel; it anchors plants and houses beneficial bacteria. Options include:
* **Gravel:** Affordable and easy to siphon. Good for bare-bottom or planted setups.
* **Sand:** Aesthetically pleasing and mimics riverbeds. Bottom-dwelling fish love digging in sand, but it compacts easily. Needs careful vacuuming to prevent anaerobic pockets.
* **Aquatic Soil:** Specifically formulated for planted tanks. It lowers pH slightly and releases nutrients for plants. However, it creates murky water when first used and doesn’t last forever before degrading.
For a beginner setup aiming for versatility, fine-grained neutral gravel is often the safest choice. Rinse it thoroughly before adding to the tank to remove dust.
### LED Lighting Systems
Lighting drives photosynthesis for live plants and reveals the colors of your fish. Modern aquarium LEDs are energy-efficient and cool running. If you plan to keep live plants, invest in a spectrum that supports red and blue pigments (around 6500K color temperature). Full-spectrum white LEDs mimic daylight cycles, helping regulate fish sleep rhythms. Timer integration is crucial; aim for 8-10 hours of light daily to prevent algae spikes.
## 3. Step-by-Step Tank Assembly
Once you have all materials, the assembly phase begins. Patience during this stage prevents leaks and future algae problems. Follow these actions sequentially for a robust setup.
### Rinsing Materials
Never skip this step! Wash your substrate under cold running water until the runoff is clear. Old sand or gravel contains dust that causes cloudy water for days. Likewise, rinse hardscape decorations like rocks and driftwood. If using wild-found rocks, boil them to sterilize. Driftwood may need soaking in water for weeks to stop it from releasing tannins that stain the water yellow (though some prefer stained water). Pre-rinsing everything saves hours of filtration work later.
### Layering Substrate
Pour your substrate gently onto the bottom of the empty tank. Use a plate to diffuse the water stream if pouring directly to prevent clouding. The front edge should ideally be thinner than the back edge to allow viewers to see deeper into the tank. Aim for a depth of 2-3 inches for root-based plants, or less for gravel-only setups. Tilt the front of the substrate slightly towards the back to enhance the viewing angle.
### Arranging Hardscape Decorations
Decide on your layout before filling the tank. A popular aesthetic is the “rule of thirds,” where key focal points (a rock or piece of wood) fall off-center. Place heavier rocks first to anchor them safely. If you are planting, bury the roots of stems or mosses now. Secure floating ferns or Anubias by tying them to wood with cotton thread rather than gluing, which can eventually die and rot. Ensure nothing blocks the intake tube of your filter or obstructs the heater sensor.
### Positioning Hardware Correctly
Place your heater near the filter output to ensure warm water circulates throughout the tank, preventing cold spots. Insert your filter according to manufacturer instructions, making sure the sponge sits flush with the intake. Route power cords securely so they cannot fall into the tank’s water (if possible) and plug them into a GFCI outlet for safety. Finally, place a bowl or bag over the substrate while filling to prevent splashing soil everywhere.
### Filling the Tank
Slowly fill the tank with dechlorinated tap water. Use a slow-fill technique (pouring water onto a saucer in the middle of the tank) to avoid eroding your substrate design. Fill to about 3/4 capacity initially to leave room for fish displacement later, though most tops require it full. Check for leaks around the silicone seams immediately. Once full, let it settle overnight before proceeding to cycling.
## 4. Water Treatment and Nitrogen Cycling
This is arguably the most critical phase. Skipping it is the #1 cause of death for new fish. You cannot simply put fish in freshly filled water, even if it looks clean. Water treatment and cycling prepare the biological environment for life.
### Filling with Dechlorinated Water
Tap water contains chlorine and chloramines, which are lethal to fish and kills beneficial bacteria. Use a liquid conditioner/dechlorinator. Dose it according to the bottle instructions immediately upon filling. Also test your source water hardness (GH/KH) if possible, as this dictates what species can survive. Soft water is needed for discus or tetras; hard water suits mollies or livebearers.
### Understanding the Nitrogen Cycle
Fish produce waste in the form of ammonia. Ammonia is highly toxic even in small amounts. Naturally, beneficial bacteria convert ammonia into nitrites, which are less toxic but still harmful. A second group of bacteria converts nitrites into nitrates, which are far less toxic and removed via water changes. This chain reaction is the “Nitrogen Cycle.”
In a new tank, none of these bacteria colonies exist yet. This period is called “New Tank Syndrome.” You must cycle the tank before adding fish. This means letting the filter run continuously for 4 to 6 weeks.
### Seeding Beneficial Bacteria
You can speed this up by buying bottled beneficial bacteria starter cultures or by moving filter media from an established older tank. Some hobbyists use a process called “fishless cycling,” where they add a pure ammonia source to feed the bacteria until the cycle completes. Monitor your water weekly using liquid test kits (not strips) to check for Ammonia, Nitrite, and Nitrate levels. Only proceed once Ammonia and Nitrite read zero after adding ammonia, while Nitrates begin to appear.
### Temperature and Stability
Keep the temperature consistent during cycling. Higher temperatures accelerate bacterial growth. Ensure the heater stays on throughout the 4-week cycle even without fish. During this time, perform small water changes (20%) to prevent Nitrate buildup from getting too high, which can stall bacterial colony growth. Never change more than 30% during cycling as it might wash away the developing colonies.
## 5. Stocking and Maintenance Overview
Now that your ecosystem is biologically active and safe, it is time to bring in the livestock and establish a routine.
### Hardy Fish Species Suitable for Beginners
Patience is key. Start small. Overstocking is fatal. A good ratio for beginners is one inch of fish per gallon, though community behavior matters more. Recommended hardy species include:
* **Zebra Danios:** Very active, hardy, tolerate cooler temps.
* **Platies and Mollies:** Colorful, easy to breed, peaceful.
* **Corydoras Catfish:** Bottom dwellers that help clean the substrate, very social.
* **Neon Tetras:** Schooling fish that require groups of 6+ to show natural behavior.
* **Bettas:** Peaceful solo fighters (do not keep with fin-nippers like Barbs).
Avoid aggressive cichlids or large predatory fish until you master water chemistry. Always quarantine new fish in a separate hospital tank for two weeks to ensure they don’t carry parasites into your main display.
### Long-Term Care Habits
Maintenance should be a relaxed weekly ritual, not a chore.
1. **Weekly Water Changes:** Replace 25-30% of the water every week. This removes nitrates accumulated from waste. Use a gravel vacuum to suck up detritus from the substrate while removing old water. Refill with fresh conditioned water matched in temperature to avoid thermal shock.
2. **Feeding Schedules:** Feed only what fish can eat in 2-3 minutes, twice a day. Uneaten food rots and spikes ammonia. Soak pellets in water before feeding to prevent constipation in fish who gulp air.
3. **Filter Cleaning:** Do not rinse the filter media under tap water; kill the bacteria! Instead, squeeze the sponges into a bucket of old tank water saved from your last water change.
4. **Algae Control:** Keep light periods consistent. Remove excess algae manually with a magnet scraper or algae pad. If algae persists despite low light and low nutrients, consider adding algae-eaters like Nerite Snails or Otocinclus catfish.
### Troubleshooting Common Issues
Even with perfect setup, issues arise. Cloudy water usually indicates a bacterial bloom; stop feeding and wait. Yellow water often comes from peat or tannins; harmless but visually distinct. Green water suggests too much light exposure. Brown diatoms indicate young water systems lacking competition. Stay calm, observe fish behavior closely (gills, fins, appetite), and test water parameters immediately if anything seems wrong.
## Conclusion
Setting up a beginner freshwater aquarium tank easily requires commitment, knowledge, and preparation, but the rewards are immense. By following this guide—planning your space wisely, investing in essential equipment like a proper filter and heater, assembling carefully, cycling the water patiently, and maintaining a strict feeding and cleaning schedule—you lay the foundation for a vibrant underwater world.
Remember, an aquarium is a living system. It takes time to mature and stabilize. Be observant of your fish, enjoy the tranquility they bring, and celebrate the progress of your planted landscape. With proper care, your freshwater tank will remain a stunning oasis for years to come. Welcome to the hobby, and happy fish keeping!
## Frequently Asked Questions (FAQ)
### How often should I change the water?
Aim for 25% water changes once a week. This balances hygiene with preserving beneficial bacteria.
### Can I use regular houseplants in my aquarium?
Generally, no. Many terrestrial plants rot quickly and spoil water quality. Use aquarium-safe varieties like Java Fern, Anubias, or Amazon Sword which are adapted to submerged environments.
### What do I do if my fish dies?
Remove the body immediately to prevent disease spread. Test water parameters to ensure the cause wasn’t ammonia poisoning or temperature swing. If multiple fish die, disinfect the tank and restart the cycle.
### Is tap water safe if I use conditioner?
Yes, provided your tap water is free of heavy metals or pesticides. Using a dechlorinator neutralizes chlorine instantly, making it safe for sensitive organisms.
Comments

FreshieStart
Guide was actually readable! Got some tetras now. Hope they settle in easy peasy.
👍 17👎 0

BettaFan22
Nitrogen cycle took forever tbh. Is 2 weeks safe to add a betta? Or wait longer?
👍 9👎 0

PlantMom
Sticking tanks away from sun worked! Algae is gone finally. Wish I read this before my 2nd attempt died.
👍 25👎 0

FilterGuy
Any recs on filters? Need something cheap but reliable for a small tank. Budget is tight 😅
👍 12👎 0

AquascapeDan
Substrate layers u mentioned looked nice. Much better then dumping gravel everywhere. Plants are chill rn.
👍 22👎 0

AquaNewbie_23
Hey, is tap water okay if I add dechlorinator? Worried about hardness levels though..
👍 26👎 0

FishLover99
Finally got my 20g running! The cycling thing really helped, lost half my fish last time bc i rushed it lol.
👍 5👎 0