How To Trim Dog Nails Safely At Home
Safe Trimming, Happy Paws
1. Understanding the Importance of Regular Nail Care
Before picking up a pair of clippers, it is vital to understand the underlying reason why keeping your dog’s nails short is non-negotiable. Neglecting nail care does not result in a minor annoyance; it can lead to significant structural damage over time.The Impact on Posture and Joint Health
When a dog’s nails grow too long, they force the animal’s toes to splay outward. Imagine trying to wear shoes that are two sizes too big; your feet would slip inside, and your balance would constantly compensate. Similarly, long nails push the toes into an unnatural position, altering the way the dog distributes its weight across its paws. Instead of landing flat on the paw pads, the dog lands partially on its claws. Over months and years, this incorrect loading pattern places excessive strain on the carpal joints (the wrists), elbows, and even the shoulders. This constant misalignment accelerates wear and tear on the joints, potentially leading to premature arthritis or exacerbating existing orthopedic conditions such as hip dysplasia. In severe cases, the nails may become curved backward, embedding into the paw pads and causing permanent deformity.Walking Ability and Pain Prevention
Long nails are also physically cumbersome. They catch on carpets, hardwood floors, and grassy terrain, causing trips and falls. For active dogs, this friction creates discomfort with every step. You may notice your dog avoiding certain surfaces or limping after a walk—often unexplained by injury, these are actually symptoms of painful nail pressure. Furthermore, the sound of clicking nails on hard floors is often the first indicator owners notice. Ignoring these clicks ignores the pain they imply. Maintaining proper nail length prevents the nails from touching the ground entirely when the dog walks normally, allowing for silent, natural movement free from discomfort. Preventing these injuries at home saves your dog from chronic pain and protects your family’s peace of mind.2. Essential Tools and Preparation for Success
Approaching nail trimming without the right equipment increases the risk of accidents. Having a dedicated, organized setup reduces hesitation on your part, which translates to a calmer environment for your dog.Necessary Equipment List
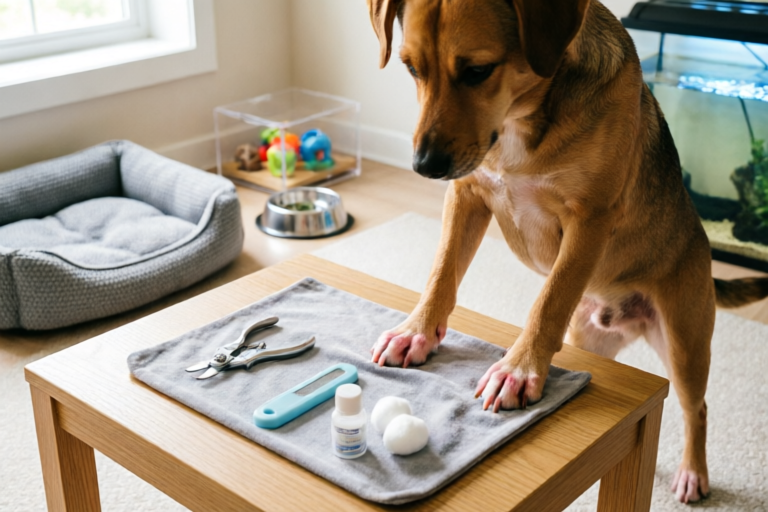
Type of Clippers
There are generally three types of nail trimmers available on the market, and choosing the right one depends on your dog’s nail thickness and your personal preference: - **Guillotine Trimmers:** These feature a hole where the nail is inserted, and a blade moves up to slice through it. They work best for medium-sized dogs with thinner nails but can crush thicker nails. - **Scissor-Style Clippers:** Resembling scissors, these use two blades that squeeze together. They offer more leverage and are ideal for large breeds or dogs with tough, thick nails. - **Pincer (Plier) Clippers:** These combine elements of guillotines and scissors but provide a strong crushing action. They are excellent for larger breeds but require a firm grip. - **Nail Grinders (Dremel-style):** Electric grinders file down the nail instead of cutting it. They are great for smoothing rough edges and are less likely to cause shock to the quick, though they can generate noise that scares sensitive dogs.Safety and First Aid Supplies
You must always have **styptic powder** or a styptic pencil on hand. Even with perfect technique, accidental slips happen. Styptic powder stops bleeding immediately by constricting blood vessels. If you cannot purchase commercial powder, plain cornstarch or flour works as a temporary emergency substitute. Additionally, keep **antiseptic wipes** nearby to clean the area if the skin gets scratched during the process.High-Value Treats
Food motivation is your most powerful tool. Do not use dry kibble. Prepare low-calorie, high-aroma treats like freeze-dried liver, small pieces of cooked chicken, or peanut butter (xylitol-free). The goal is to make the experience associated with something the dog loves immensely.Setting Up a Calm Environment
Noise and distractions are the enemy of success. Choose a quiet room with minimal foot traffic. Turn off the television and radio. If you have other pets, separate them so your focus remains solely on the dog being groomed. Good lighting is also crucial; you need to see the "quick" (the live tissue inside the nail) clearly. Set up a comfortable chair or table where you can easily access the dog’s paws without straining your own back. Having a helper to hold treats or soothe the dog can also be incredibly beneficial during the session.3. Acclimating Your Dog to Paw Handling and Trimmers
Attempting to cut nails on a dog that is not accustomed to having their feet touched is a recipe for disaster. Desensitization is key. This process should ideally start weeks before the actual cutting begins.Desensitizing to Paw Touching
Make a habit of touching your dog’s paws daily, unrelated to grooming. When the dog is relaxed, gently lift a paw, touch the toes, and apply slight pressure to the nails, then immediately reward with a treat and praise. Repeat this five times in a row. Over several days, increase the duration of the touch. If your dog pulls away, do not force it. Go back to a level where they feel comfortable and try again later. Eventually, the dog should learn that paw manipulation predicts positive outcomes (treats) rather than pain.Introducing the Trimmer Without Cutting
Once your dog accepts paw handling, introduce the tool. Let the dog sniff the clippers or grinder. Allow them to inspect the metal and plastic components. Press the clippers near their paw without touching the nail, then give a treat. Next, bring the tool to the nail but do not engage it. If using a grinder, turn it on briefly away from the dog so they get used to the hum, then gradually move it closer. This process removes the fear factor of the unknown object. Never rush this phase. Some dogs may take a week, others a month. Patience here ensures safety later. Remember, if you ever smell failure, reset the timer and return to basics. Positive reinforcement is the bridge to cooperation.4. Step-by-Step Guide to Safe Trimming Technique
Once your dog is calm and prepared, you are ready for the procedure. Follow these steps meticulously to minimize risk and maximize efficiency.Proper Holding Position
Place the dog in a stable position. For smaller dogs, sitting on your lap facing sideways allows you to lean in securely. For larger dogs, having them sit or lie on a non-slip surface on the floor is easier. Secure the leg with one hand, holding the paw firmly between your thumb and index finger. Isolate the toe you intend to cut; this prevents slipping onto adjacent nails. Keep a calm demeanor yourself; dogs sense tension and will mirror your nervousness.Making Small Cuts
Hold the clipper perpendicular to the nail, not at an acute angle initially. Make small, controlled cuts. It is far better to remove too little than too much. Cut from the bottom up or the tip down depending on the clipper style, but maintain stability. For grinders, hold the tool gently against the nail surface, moving it continuously to avoid heat buildup. Always cut slowly. If using clippers, cut off a tiny bit, inspect the cross-section, and assess the center. As you get closer to the quick, the center of the nail will change color.Dealing with Dewclaws
Do not forget the dewclaws. Located higher on the leg (similar to thumbs), these nails do not touch the ground. Consequently, they grow rapidly and can curl completely inward, piercing the skin if left untrimmed. Because they are not worn down naturally, they often require the most attention. Handle them with the same caution as regular nails.5. Identifying the Quick and Handling Accidental Cuts
The "quick" is the nerve ending and blood vessel within the nail. Cutting into it causes pain and bleeding. Knowing how to identify it is the most critical skill in this guide.Understanding the Quick
In light-colored nails, the quick is visible as a pinkish core surrounded by white keratin. You should only cut the white portion. In dark-colored nails, the quick is hidden, making identification harder. Here are two methods to estimate location: - **The Cross-Section Trick:** After making a small cut, look at the fresh face of the nail. If the center is black or gray, you are safe. If you see a pink or dark gray dot appearing in the center, you are approaching the quick. Stop immediately. - **Length Rule:** Generally, cut just before the nail starts to curve downwards significantly. Measure approximately 2mm above the curvature base.Immediate First Aid for Accidental Cuts
If the dog yelps, stops chewing treats, and blood appears, remain calm. Panic helps neither of you. Immediately apply styptic powder. Squeeze a small amount into a cap, dip the bleeding nail tip into it, and press it against the wound for 10 to 20 seconds. Apply gentle pressure with cotton gauze. If styptic powder is unavailable, pour cornstarch over the tip and massage it in. Once bleeding stops, praise the dog lavishly. If bleeding persists for more than 10 minutes despite pressure, contact a veterinarian. Clean the area afterward to prevent infection, even if the cut was minor.6. Knowing When to Seek Professional Assistance
While home trimming is cost-effective and convenient, it is not suitable for every situation. Recognizing when to step back protects both the owner and the dog.Signs of Excessive Anxiety or Aggression
If your dog consistently growls, snaps, or shows signs of panic that cannot be soothed during the acclimation phase, forcing the issue is unsafe. An injured dog from a scratch bite puts you at risk, and a stressed dog makes bad decisions for grooming. Signs include trembling, hiding, drooling excessively, or attempting to flee the room repeatedly. In these cases, the risk outweighs the benefit of home attempts.Black Nails and Health Concerns
Dogs with jet-black nails pose a significant challenge for inexperienced owners. Without specialized X-ray guidance or advanced knowledge of nail anatomy, finding the quick in a solid black nail carries a high risk of error. If you own a dog with black nails and are unsure of your estimation skills, consider visiting a professional groomer or veterinarian once or twice to learn the technique under supervision. Furthermore, if your dog has underlying health concerns such as poor circulation, diabetes, or clotting disorders, consult your vet before trimming. Medications like steroids can also thin nail beds, increasing bleeding risk.The Cost-Benefit Analysis
Professional groomers and vets charge for this service. While the cost adds up, compare it to the potential medical bills resulting from trauma caused during a DIY accident. If you have tried acclimation for three months with no progress, seek professional help. Sometimes, sedation administered by a vet is a humane option for severely anxious dogs.Conclusion
Trimming your dog’s nails safely at home is a skill that requires patience, preparation, and practice. By respecting the process and prioritizing your dog’s emotional well-being alongside their physical health, you can transform this chore into a bonding opportunity. Remember that consistency beats intensity. Short, frequent sessions are better than one long, stressful marathon. Use the right tools, maintain a calm atmosphere, and always keep styptic powder ready. With time, your dog will likely view nail time as a pleasant routine involving treats and affection rather than a source of fear. Your diligence today prevents arthritis and discomfort tomorrow, ensuring your four-legged friend stays active and pain-free for years to come.Frequently Asked Questions (FAQ)
How often should I trim my dog’s nails?
It depends on your dog’s activity level. Active dogs that run frequently on pavement may naturally wear down their nails. However, for most indoor or suburban dogs, trimming every 3 to 4 weeks is recommended. A good rule of thumb: listen for the click on the floor. If you hear it, it’s time to cut.Can I use human nail clippers?
No. Human clippers are designed for flat nail plates, whereas dog nails are round and thicker. Using human clippers can split or crush a dog’s nail, causing extreme pain. Invest in pet-specific tools.Why does my dog pull away when I touch his paws?
Some dogs simply dislike the sensation or the memory of previous discomfort. Reassess your acclimation steps. Maybe you moved too fast. Try shorter touches paired with higher-value treats until they regain confidence.Is grinding safer than clipping?
Grinding offers smoother edges and lowers the risk of hitting the quick quickly, but it generates heat and noise. For some dogs, the vibration and smell are unsettling. Both methods are valid; choose based on what your dog tolerates best."}Comments

Does anyone else struggle with the quick bleeding? I tried your method but ended up needing vet visit because it wouldn't stop. Might stick to groomers for us.
Wait, can you use cornstarch instead of styptic powder if you forget to buy it? Just realized my dog needs one ASAP and I'm out of supplies.
The clicking noise stopped immediately after we trimmed these! Didn't realize my golden retriever's joints were hurting that much. Going to make sure she doesn't grow them back too long lol.

Honestly I think professional grooming is better for some breeds. Got my poodle's nails done by a pro today because mine were curling weird. Better safe than sorry tbh.

Huge thanks for the section on desensitizing. I was rushing and my foster pup bit me once before reading this. Took two weeks just to let him sniff the trimmer now we're halfway there.

Tried this last night. My border collie still freaked out a bit over the noise of the clippers but the styptic powder tip saved me when he slipped. Thanks for the advice!

Quick question – does the 45 degree angle rule apply to black nails too? Mine are so dark I can't see the pink at all. Nervous about cutting into the quick 😅

This actually worked! My lab used to run away but I started giving him cheese during the paw touching phase. Finally did both back feet today without drama. 🐶